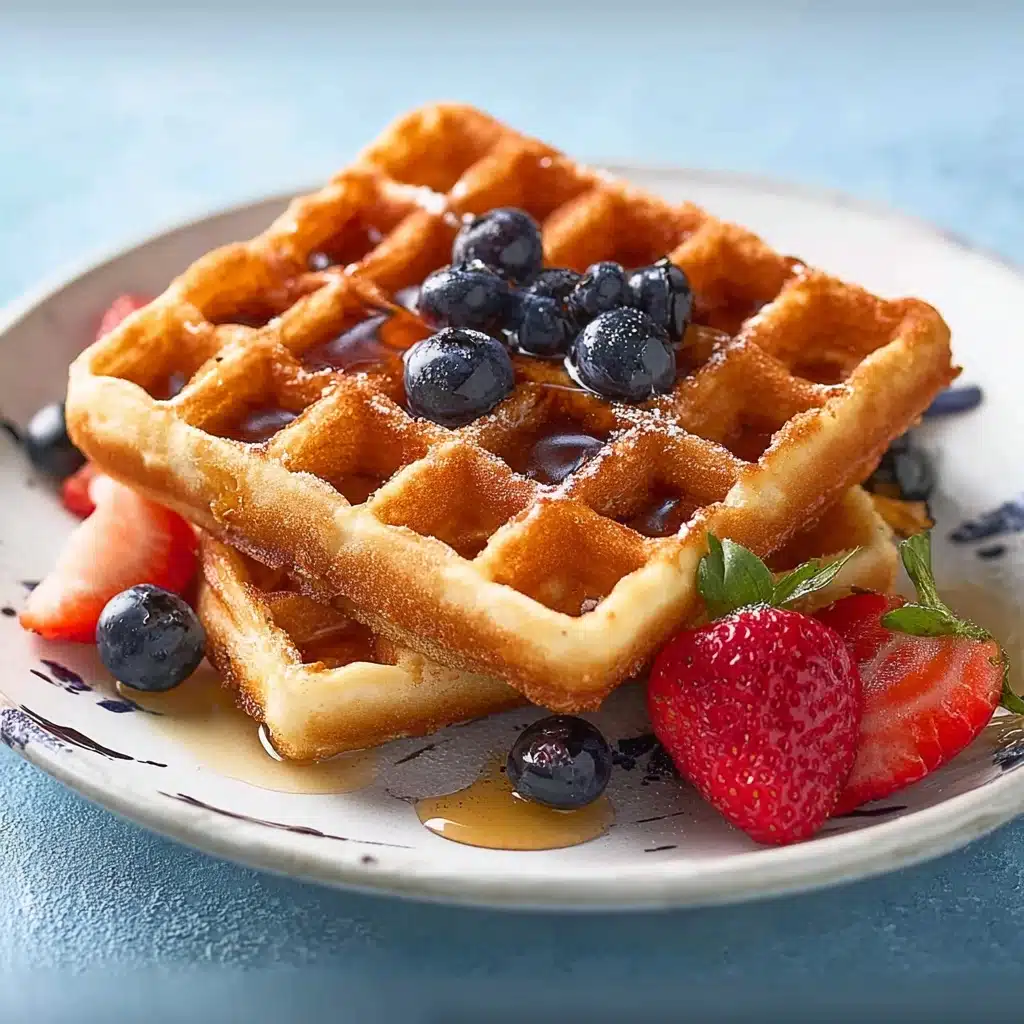
Almond Flour Waffles Recipe
Sinking your fork into these Almond Flour Waffles is pure breakfast bliss! This recipe is a game-changer for anyone craving classic, crispy-edged waffles with a delightful nutty spin. Perfectly golden, tender inside, and naturally gluten-free, they’re quick to whip up and so versatile. Whether you’re jazzing up your weekend brunch or looking for a weekday treat, Almond Flour Waffles are about to become your new go-to morning favorite.
Ingredients You’ll Need
The beauty of Almond Flour Waffles lies in their simplicity: each ingredient plays a unique role, from flavor to texture. Gather these kitchen staples and you’ll be moments away from waffle wonderland!
- Almond flour: Gives the waffles their moist, nutty flavor and irresistibly tender crumb—use finely ground for the best texture.
- Sugar (white, brown or coconut): Just a touch enhances flavor and promotes beautiful browning, so feel free to choose your favorite variety.
- Baking powder: Provides the lift and fluffiness you expect in a good waffle.
- Large egg: Binds everything together for structure and richness.
- Milk: Brings the batter to the perfect consistency—use dairy or any unsweetened plant-based milk you like.
- Melted butter or coconut oil: Adds richness and a crisp exterior; choose coconut oil for dairy-free or a hint of tropical flair.
How to Make Almond Flour Waffles
Step 1: Preheat Your Waffle Iron
Start by preheating your waffle maker according to its instructions. This ensures every Almond Flour Waffle grills perfectly and releases easily—no sticky mess! If your iron has a browning setting, set it to medium or medium-high for that signature golden exterior.
Step 2: Mix the Dry Ingredients
In a small bowl, whisk together your almond flour, sugar, and baking powder. This step ensures the leavening is evenly distributed and prevents clumps, giving you an even rise and flavor all throughout your Almond Flour Waffles.
Step 3: Combine Wet Ingredients
Grab a larger mixing bowl and whisk the egg, milk, and melted butter (or coconut oil) until smooth and fully blended. The melted fat ensures richness, while the egg and milk create a creamy, cohesive batter base for the waffles.
Step 4: Bring the Batter Together
Add the dry ingredients into the wet mixture. Stir gently until everything just comes together—over-mixing can make even Almond Flour Waffles tough instead of tender. A few small lumps are totally fine and won’t affect the final result!
Step 5: Prepare Your Waffle Iron
Before cooking, spray or brush your hot waffle iron with a bit of oil or non-stick spray. This extra step guarantees easy release and crisp, beautifully patterned Almond Flour Waffles every time.
Step 6: Cook the Waffles
Pour about 1/3 cup of batter per waffle into the hot iron, spreading gently if needed. Cook for 4 to 5 minutes, or until waffles are a deep golden brown and slightly crisp at the edges. Timing might vary by waffle iron, so peek as you go. Repeat with remaining batter and get ready for warm, waffle heaven!
How to Serve Almond Flour Waffles

Garnishes
The blank canvas of Almond Flour Waffles begs for fun, festive toppings! Classic maple syrup is always a win, or go bolder with fresh berries, sliced banana, a dollop of Greek yogurt, or a sprinkle of toasted nuts. For something indulgent, a drizzle of nut butter or chocolate sauce takes these over the top.
Side Dishes
Round out your breakfast table by pairing your Almond Flour Waffles with crispy bacon, savory breakfast sausage, or a bright fruit salad. If you’re feeling extra, a fluffy cloud of scrambled eggs on the side balances the sweetness and keeps everyone satisfied for hours.
Creative Ways to Present
Why not turn these Almond Flour Waffles into a breakfast board? Slice them into quarters and lay out a spread of toppings and fresh fruit for everyone to assemble their dream plate. Or stack them tall, layered with whipped cream and fruit for a celebratory brunch centerpiece.
Make Ahead and Storage
Storing Leftovers
If you find yourself with extras—lucky you! Let the Almond Flour Waffles cool completely, then store them in an airtight container in the refrigerator. They’ll stay fresh for up to three days and reheat beautifully for busy mornings.
Freezing
Double your batch and freeze for ready-made breakfasts all week. Lay cooled waffles in a single layer on a baking sheet to freeze, then transfer to a zip-top bag. Stored this way, your Almond Flour Waffles will keep for up to three months, ready to pop in the toaster whenever the craving strikes.
Reheating
For peak crispiness, reheat waffles in a toaster or toaster oven until warmed through and edges are revived. If using a microwave, heat briefly on low power; however, they’ll be a bit softer compared to the toaster method.
FAQs
Can I make Almond Flour Waffles dairy-free?
Absolutely! Swap in any unsweetened plant-based milk and use coconut oil instead of butter. The result is still just as flavorful, with an extra hint of coconut if you like.
Do Almond Flour Waffles taste eggy?
Nope—they turn out nutty and subtly sweet with just one egg in the batter. If you prefer, you can add a pinch of vanilla or cinnamon for more flavor depth.
Why are my waffles sticking to the iron?
A well-greased, thoroughly preheated waffle iron is key. Be sure to spray or brush oil between every batch, and let the iron get nice and hot before adding your batter.
Can I double the recipe for a crowd?
Yes! Just multiply each ingredient by two and follow the same steps. Almond Flour Waffles are always a hit at brunch parties or family breakfasts.
What’s the best way to keep waffles crisp?
Place cooked waffles on a wire rack set over a baking sheet in a warm oven while you finish the batch. This keeps them crisp on all sides until serving.
Final Thoughts
There’s nothing quite like waking up to the aroma of fresh Almond Flour Waffles. They’re quick, cozy, and endlessly customizable—give them a try and watch them disappear from your breakfast table in no time. Happy waffling!
PrintAlmond Flour Waffles Recipe

These delicious almond flour waffles are a gluten-free and low-carb alternative to traditional waffles, perfect for a wholesome breakfast or brunch.
- Prep Time: 10 minutes
- Cook Time: 20 minutes
- Total Time: 30 minutes
- Yield: 5–6 waffles 1x
- Category: Breakfast, Brunch
- Method: Waffle Iron
- Cuisine: American
- Diet: Gluten Free
Ingredients
Almond Flour Waffles:
- 1 1/2 cups almond flour
- 2 teaspoons sugar (white, brown, or coconut)
- 1 1/2 teaspoons baking powder
Wet Ingredients:
-
- 1 large egg
- 1/2 cup milk
- 1 1/2 tablespoons melted butter or coconut oil
Instructions
- Preheat Waffle Iron: Preheat your waffle iron following the manufacturer’s instructions.
- Mix Dry Ingredients: In a small bowl, whisk together almond flour, sugar, and baking powder.
- Combine Wet Ingredients: In a larger bowl, whisk the egg, milk, and melted butter or coconut oil. Stir in the flour mixture until just combined.
- Grease Waffle Iron: Grease the hot waffle iron with cooking spray.
- Cook Waffles: Pour about 1/3 cup of batter onto the waffle iron. Cook until the waffles are deep golden brown, typically 4 to 5 minutes per waffle.
- Serve: Serve the waffles with maple syrup. This recipe yields 5 to 6 waffles, depending on the waffle maker used.
Notes
- For added flavor, consider adding vanilla extract or cinnamon to the batter.
- These waffles freeze well for future quick breakfasts.
Nutrition
- Serving Size: 1 waffle
- Calories: 220
- Sugar: 4g
- Sodium: 180mg
- Fat: 17g
- Saturated Fat: 3g
- Unsaturated Fat: 12g
- Trans Fat: 0g
- Carbohydrates: 10g
- Fiber: 3g
- Protein: 8g
- Cholesterol: 45mg
Keywords: Almond Flour Waffles, Gluten-Free Waffles, Breakfast, Brunch, Low-Carb Waffles


