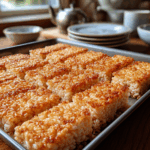
Crispy Rice Recipe
If you have ever dreamed of biting into perfectly crunchy, golden morsels of goodness, then Crispy Rice is about to become your new obsession. This dish celebrates the humble grain in a way that transforms plain rice into a delightful textural adventure with a beautiful balance of crispiness and soft, tender insides. Whether enjoyed on its own or used as a platform for your favorite toppings, Crispy Rice is an irresistible treat that’s surprisingly simple to master and endlessly satisfying.

Ingredients You’ll Need
Gathering just the right ingredients is half the fun here. Each element plays a crucial role: from the type of rice that ensures that perfect bite, to the touch of sweetness and tanginess from the seasoning that rounds out the flavor profile beautifully.
- Sushi rice (2 cups): This short-grain rice sticks just right to create that tender yet firm texture essential for Crispy Rice.
- Water (2 1/2 cups): Proper hydration is key for perfectly cooked rice that crisps well.
- Rice vinegar (2 tbsp): Adds a mild acidity that brightens the rice’s flavor and helps it bind for frying.
- Sugar (1 tbsp): Balances out the vinegar with a hint of sweetness, enhancing the overall taste.
- Salt (1/2 tsp): Essential for seasoning and amplifying the natural flavors of the rice.
- Neutral oil (2 tbsp): Choose avocado, vegetable, or sesame oil to get an even, golden crust without overpowering the rice.
How to Make Crispy Rice
Step 1: Cook the Rice
Start by rinsing the rice under cold water until it runs clear—this will wash away excess starch and prevent your rice from turning gummy. Next, bring the rice and water to a boil in a pot. Once boiling, lower the heat to a gentle simmer and cover the pot. Let it cook undisturbed for about 15 minutes until all the water is absorbed. After removing from heat, keep the pot covered and allow the rice to steam for another 10 minutes. This method ensures fluffy, perfectly cooked rice that will hold up beautifully.
Step 2: Season the Rice
In a small bowl, combine rice vinegar, sugar, and salt, stirring until everything dissolves completely. Gently fold this flavorful mixture into your warm rice, being careful not to mash the grains. This seasoning step is what brings depth and the right balance to your Crispy Rice, while also helping the rice stick together enough for the pan-frying process.
Step 3: Chill the Rice
Press the seasoned rice evenly into a shallow pan to form a compact, approximately 1-inch thick layer. Cover it with plastic wrap and refrigerate for at least four hours, or better yet, overnight. Chilling firms up the rice, making it much easier to slice and crucially helping you achieve that sought-after crispy exterior when frying.
Step 4: Cut the Rice
Once chilled and firm, gently lift the rice out of the pan and cut it into bite-sized squares or rectangles. This step is key to getting those delightful individual pieces that crisp up evenly in the pan and make for a perfectly portioned snack or side.
Step 5: Pan-Fry Until Golden
Heat your chosen neutral oil in a non-stick pan over medium heat. Working carefully to avoid overcrowding, place the rice pieces in the pan and cook them for about 3 to 4 minutes on each side. You’ll want to watch closely as they transform into delicious golden-brown bites with an irresistible crunch. Once done, transfer the crispy rice to paper towels to drain any excess oil.
Step 6: Serve and Enjoy
Your Crispy Rice is now ready to shine! Serve it warm as is, or pile on toppings like creamy avocado slices, spicy tuna, or a light drizzle of soy sauce. Each bite offers an amazing combination of crunch and comfort that’s hard to beat.
How to Serve Crispy Rice

Garnishes
Elevate your Crispy Rice with simple yet flavorful garnishes such as sliced scallions, a sprinkle of toasted sesame seeds, or thin strips of nori. Adding a dollop of spicy mayo or a smear of wasabi can also introduce a brilliant kick that pairs perfectly with the crunchy texture.
Side Dishes
Crispy Rice pairs wonderfully with fresh Asian-inspired sides like cucumber salad, seaweed salad, or pickled ginger. For a more substantial meal, try it alongside grilled vegetables or a bowl of miso soup for a balanced and delightful dining experience.
Creative Ways to Present
Don’t hesitate to get creative! Use your Crispy Rice as a base for mini sushi bites topped with salmon tartare or shrimp ceviche. Alternatively, you could serve it as crispy rice cakes accompanying a spicy dipping sauce, turning this humble dish into a show-stopper at your next gathering.
Make Ahead and Storage
Storing Leftovers
If you have leftovers, store your cooked but uncooked-for-frying rice in an airtight container in the refrigerator for up to 3 days. However, once the rice is fried into Crispy Rice, it’s best enjoyed fresh to preserve that crunch.
Freezing
You can freeze the pre-cut, chilled rice squares before frying, placing them in a single layer on a baking sheet until firm and then transferring them to a freezer-safe bag. When you’re ready, just pan-fry them straight from frozen, allowing a bit more cooking time.
Reheating
For reheating cooked Crispy Rice bites, avoid the microwave as it makes them soggy. Instead, warm them in a hot, dry skillet to help regain their crunch, or pop them in a preheated oven at 375°F (190°C) for a few minutes until crisp again.
FAQs
Can I use long-grain rice for Crispy Rice?
While you can try, sushi or short-grain rice works best because of its stickiness and texture, which holds together nicely when fried.
Why do I need to chill the rice before frying?
Chilling firms up the rice, making it easier to cut and helping it maintain its shape when frying, delivering that perfect crispy crust.
What is the best oil to use for frying Crispy Rice?
Neutral oils with a high smoke point like avocado, vegetable, or sesame oil work beautifully to create a golden crust without adding strong flavors.
Can I make Crispy Rice vegan?
Absolutely! Crispy Rice itself is vegan-friendly, and you can pair it with vegan-friendly toppings like avocado, pickled vegetables, or spicy tofu.
How do I get the crispiest texture possible?
Make sure the rice is well chilled and not too thick when pressed into the pan. Also, frying over medium heat without overcrowding the pan ensures even, crispy results.
Final Thoughts
Crispy Rice is one of those wonderful recipes that proves how simple ingredients and a bit of patience can lead to something truly special. It’s perfect for sharing, snacking, or impressing guests with minimal fuss. I encourage you to try making Crispy Rice yourself—it’s rewarding, delicious, and quickly becomes a beloved favorite on any table.
PrintCrispy Rice Recipe
Crispy Rice is a delightful dish featuring perfectly cooked sushi rice that is seasoned, chilled, cut into squares, and pan-fried until golden and crispy. This versatile recipe makes an excellent base for toppings like spicy tuna or avocado, perfect for appetizers or light snacks.
- Prep Time: 20 minutes
- Cook Time: 20 minutes
- Total Time: 4 hours 40 minutes
- Yield: Serves 4
- Category: Appetizer
- Method: Boiling, Pan-frying
- Cuisine: Japanese
- Diet: Vegetarian
Ingredients
Rice Preparation
- 2 cups sushi rice (or any short-grain rice)
- 2 1/2 cups water
Seasoning
- 2 tbsp rice vinegar
- 1 tbsp sugar
- 1/2 tsp salt
For Frying
- 2 tbsp neutral oil (avocado, vegetable, or sesame oil)
Instructions
- Cook the Rice: Rinse the sushi rice under cold water until the water runs clear to remove excess starch. In a pot, combine the rinsed rice and 2 1/2 cups water, bring to a boil, then reduce heat to low, cover, and simmer for about 15 minutes until water is absorbed. Remove from heat and let it sit covered for 10 minutes.
- Season the Rice: In a small bowl, mix rice vinegar, sugar, and salt until dissolved. Gently fold this seasoning mixture into the cooked rice to add flavor and help the rice stick together for frying.
- Chill the Rice: Transfer the seasoned rice to a shallow pan or baking dish, press down firmly to create an even 1-inch thick layer. Cover with plastic wrap and refrigerate for at least 4 hours or overnight to firm up the rice for easier cutting and crisping.
- Cut the Rice: Remove the chilled rice from the pan and cut it into squares or rectangles to ensure even frying and classic crispy rice shapes.
- Pan-Fry Until Golden: Heat the neutral oil in a pan over medium heat. Place rice pieces carefully in the pan without overlapping. Fry for 3-4 minutes on each side until golden brown and crispy. Remove and drain on paper towels.
- Serve and Enjoy: Enjoy the crispy rice as is, or enhance with toppings such as spicy tuna, avocado slices, or a drizzle of soy sauce for additional flavor.
Notes
- Make sure to rinse the rice thoroughly to avoid overly sticky rice.
- Allow rice to chill fully for best frying results.
- Use a neutral oil with a high smoke point for frying.
- Store leftovers refrigerated and reheat in a pan for crispiness.
- This recipe can be adapted with gluten-free soy sauce for those needing gluten-free options.
Nutrition
- Serving Size: 1/4 of recipe
- Calories: 220
- Sugar: 4 g
- Sodium: 300 mg
- Fat: 7 g
- Saturated Fat: 1 g
- Unsaturated Fat: 6 g
- Trans Fat: 0 g
- Carbohydrates: 33 g
- Fiber: 1 g
- Protein: 4 g
- Cholesterol: 0 mg
Keywords: crispy rice, sushi rice recipe, pan-fried rice, Japanese appetizer, rice bites, crispy rice cakes


