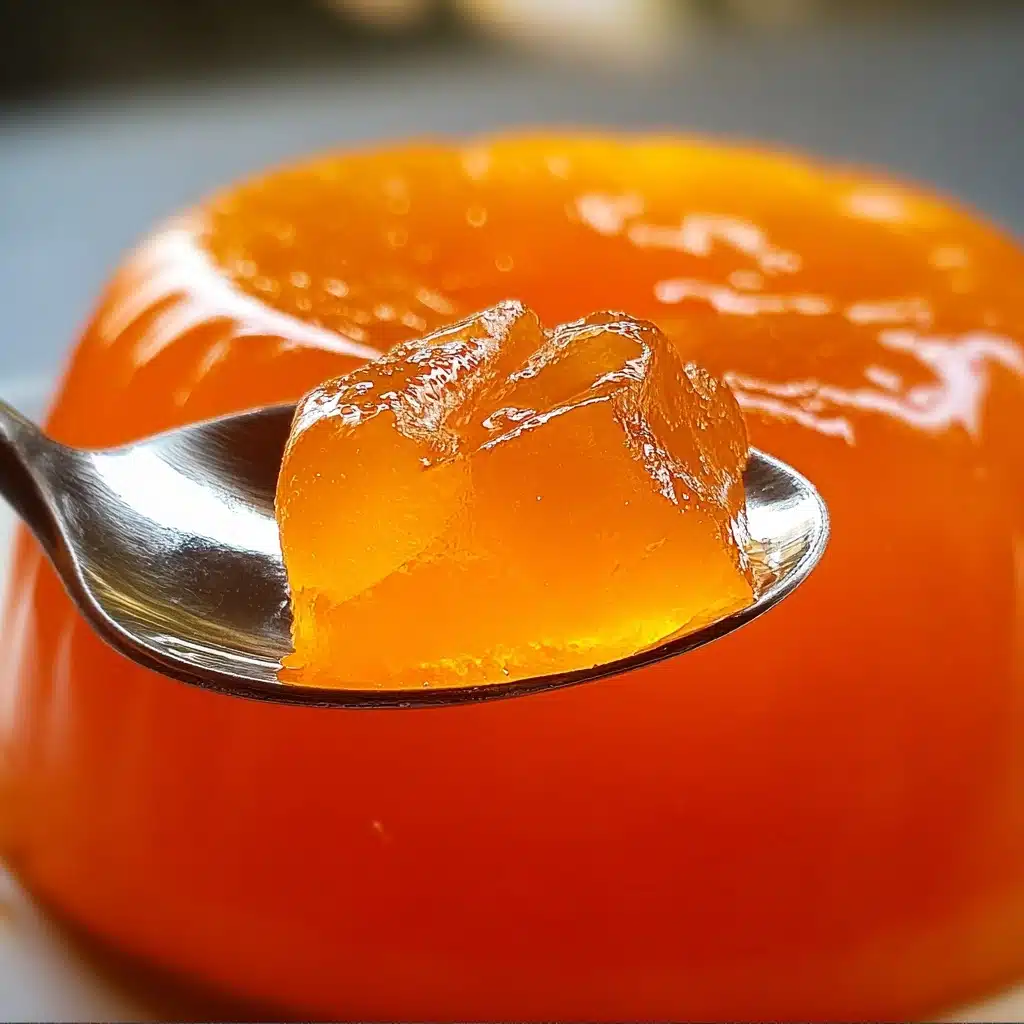
Dreamsicle Jelly Recipe
If you adore the bright, creamy flavors of classic orange creamsicles, you’re going to fall head over heels for this homemade Dreamsicle Jelly. This delightful jelly captures the essence of fresh orange juice paired with the luscious warmth of real vanilla beans, creating a spread that’s both vibrant and indulgent. Whether you’re slathering it on toasted bread or stirring it into yogurt, Dreamsicle Jelly offers a nostalgic yet sophisticated taste that brightens every bite and invites you to savor a little slice of sunshine any day of the year.

Ingredients You’ll Need
Creating the magic of Dreamsicle Jelly is wonderfully easy because it hinges on just a handful of simple, fresh ingredients. Each component plays a crucial role — from the sweetness and tang of fresh orange juice to the creamy depth of real vanilla beans, every ingredient ensures that perfect balance of flavor and texture.
- Freshly squeezed orange juice (4 cups): The foundation of this jelly, it brings bright citrus flavor and natural acidity to balance the sweetness.
- Sugar (4 cups): Essential for sweetness and achieving the right jelly consistency.
- Vanilla beans (2, split and scraped): These add a deeply aromatic and creamy vanilla note that mimics the classic creamsicle taste beautifully.
- Butter (1 pat): A tiny bit of butter helps reduce foaming during boiling for a clearer jelly.
- Pectin (optional, 1 box): Use this if you want a faster set, but you can skip it if you prefer to rely on natural pectin and temperature control.
How to Make Dreamsicle Jelly
Step 1: Strain the Juice
Start by straining the freshly squeezed orange juice through cheesecloth to remove all pulp and seeds. This step is key to achieving the smooth, jellied texture that makes Dreamsicle Jelly so elegantly spreadable.
Step 2: Combine Ingredients
In a large pot, pour the strained orange juice and add sugar, the pat of butter, the vanilla bean seeds, and the split beans themselves. This combination will infuse the jelly with both sweet and creamy vanilla undertones.
Step 3: Boil the Mixture
Bring everything up to a rolling boil over high heat. This vigorous boil is critical for dissolving the sugar thoroughly and activating the gelling properties of the juice or added pectin.
Step 4: Add Pectin (If Using)
If you choose to use pectin, sprinkle it in now and stir continuously until the mixture returns to a rolling boil. Let it boil for exactly one minute to ensure proper setting according to pectin instructions.
Step 5: Boil Without Pectin
If skipping pectin, maintain the heat until the jelly mixture reaches 220°F, holding that temperature steadily for three minutes. This technique thickens the jelly naturally without added gelling agent.
Step 6: Remove from Heat and Prepare Jars
Once the jelly has reached the desired temperature and consistency, take the pot off the heat. Remove the vanilla beans carefully, then ladle the hot jelly into sterilized jars, wiping rims clean before sealing with lids and bands.
Step 7: Process and Cool
Process the sealed jars in a boiling water canner for 10 minutes to ensure preservation. Afterward, set the jars on a towel-lined countertop out of drafts, flipping them every 10 minutes to evenly distribute the vanilla flecks throughout the jelly as it cools.
Step 8: Seal Check
Once completely cooled, check each jar’s seal. Any unsealed jars should be refrigerated and used promptly, while properly sealed jars can be stored in your pantry for months of jelly bliss.
How to Serve Dreamsicle Jelly
Garnishes
Garnish your desserts or breakfast creations lightly with fresh orange zest or a few vanilla bean seeds to elevate the presentation and hint at the flavors inside the jelly. A sprig of mint adds a fresh burst that contrasts wonderfully.
Side Dishes
Dreamsicle Jelly pairs wonderfully with warm buttered toast, flaky croissants, or scones. It also makes a bright accompaniment to creamy cheeses like brie or mascarpone, perfect for a cozy brunch plate.
Creative Ways to Present
Think beyond toast and use Dreamsicle Jelly as a glaze for roasted citrus chicken or as a swirl in homemade yogurt parfaits layered with granola and fresh berries. Its vibrant orange color also makes it a stunning topping for cheesecake or panna cotta.
Make Ahead and Storage
Storing Leftovers
Store any leftover Dreamsicle Jelly jars in a cool, dark place like a pantry or cupboard. Once opened, keep them in the refrigerator and consume within a month for the best flavor and freshness.
Freezing
You can freeze Dreamsicle Jelly if you want to keep it longer. Pour it into freezer-safe containers leaving some space for expansion. Thaw overnight in the fridge before using, though keep in mind the texture might be slightly softer after freezing.
Reheating
If your Dreamsicle Jelly thickens too much or separates after freezing, gently warm it in a saucepan over low heat while stirring until it regains its smooth, spreadable consistency.
FAQs
Do I have to use fresh orange juice for Dreamsicle Jelly?
Freshly squeezed juice gives the best flavor and brightness, but if fresh isn’t available, high-quality bottled juice without additives can work in a pinch.
Can I make Dreamsicle Jelly without pectin?
Absolutely! The recipe includes instructions to set the jelly without pectin by reaching and holding the right temperature. It just takes a bit more attention but results in a natural set.
Why do I need to flip the jars as they cool?
Flipping the jars helps disperse the vanilla bean flecks throughout the jelly evenly, creating a visually appealing and uniform look that also enhances every bite.
How long will Dreamsicle Jelly keep unopened?
When properly sealed and processed, unopened jars can last up to a year stored in a cool, dark place. Always check seals before use.
Can I use other citrus fruits to make a similar jelly?
Yes, you can experiment with lemons, tangerines, or mandarins, but the classic Dreamsicle Jelly flavor is unique because of the blend of orange and vanilla that mimics that iconic creamsicle taste.
Final Thoughts
I truly hope you dive into making this dreamy, luscious Dreamsicle Jelly soon. It’s one of those recipes that feels special yet is surprisingly straightforward, adding a splash of sunshine to your breakfasts and desserts alike. Trust me, once you taste those vibrant orange and vanilla notes combined so perfectly, you’ll want to keep this jelly in your kitchen all year round!
PrintDreamsicle Jelly Recipe

Dreamsicle Jelly is a delightful homemade orange jelly infused with rich vanilla bean flavor, reminiscent of the classic Dreamsicle ice cream treat. This sweet and tangy jelly combines freshly squeezed orange juice with vanilla for a luscious spread that’s perfect for toast, pastries, or as a gift.
- Prep Time: 20 minutes
- Cook Time: 15 minutes
- Total Time: 35 minutes plus cooling time
- Yield: About 6 half-pint jars 1x
- Category: Preserves, Jelly
- Method: Boiling, Canning
- Cuisine: American
- Diet: Vegetarian
Ingredients
Jelly Ingredients
- 4 cups freshly squeezed orange juice
- 4 cups sugar
- 2 vanilla beans, split and scraped
- 1 pat of butter (about 1 tablespoon)
- 1 box fruit pectin (optional)
Instructions
- Strain the Juice: Strain the freshly squeezed orange juice through cheesecloth to remove any pulp, ensuring a smooth jelly texture free from seeds and fibrous bits.
- Combine Ingredients: In a large pot, combine the strained orange juice, sugar, butter, scraped vanilla bean seeds, and the split vanilla bean pods. The butter helps reduce foaming during boiling.
- Boil: Bring the mixture to a rolling boil over high heat, stirring frequently to dissolve the sugar and prevent scorching.
- Add Pectin (if using): If using fruit pectin, add it now and stir continuously until the mixture returns to a rolling boil. Let it boil for exactly 1 minute to activate the pectin’s gelling properties.
- Without Pectin: If you choose to skip pectin, continue boiling the mixture until it reaches 220°F (104°C) and maintain this temperature for 3 minutes to ensure proper gel formation.
- Remove from Heat: Take the pot off the heat source immediately after the boiling time is reached to prevent overcooking.
- Remove Vanilla Beans and Ladle Jelly: Carefully remove the vanilla bean pods from the pot. Ladle the hot jelly into sterilized jars while still hot to maximize shelf life.
- Seal Jars: Wipe the rims of jars clean with a damp cloth, place the lids on top, and tighten the bands to fingertip tightness to prepare for canning.
- Process the Jars: Process the sealed jars in a boiling water canner for 10 minutes to safely preserve the jelly and prevent bacterial growth.
- Cool and Flip: Carefully remove the jars from the canner and set them on a towel-lined countertop away from drafts to cool for several hours. Flip the jars upside down every 10 minutes initially, then turn them upright again to evenly distribute the vanilla specks throughout the jelly.
- Check Seals: Once cooled, check the seal on each jar by pressing the lid center. Any unsealed jars should be refrigerated and used soon, while sealed jars can be stored in a cool, dark pantry.
Notes
- Ensure jars and lids are properly sterilized before filling to prevent spoilage.
- Use freshly squeezed orange juice for the best natural flavor; commercial juice may have additives affecting jelly set.
- Butter helps reduce foaming during boiling but can be omitted if desired.
- Using pectin shortens cooking time and guarantees a firm set; skipping pectin results in a more natural jelly but requires closer temperature monitoring.
- Flipping jars during cooling helps disperse vanilla seeds evenly for visual appeal and flavor distribution.
- Store sealed jars in a cool, dark place and refrigerate after opening.
Nutrition
- Serving Size: 1 tablespoon (20g)
- Calories: 50
- Sugar: 13g
- Sodium: 0mg
- Fat: 0.1g
- Saturated Fat: 0g
- Unsaturated Fat: 0.1g
- Trans Fat: 0g
- Carbohydrates: 13g
- Fiber: 0.1g
- Protein: 0g
- Cholesterol: 0mg
Keywords: Dreamsicle jelly, orange jelly, vanilla jelly, homemade jelly, canned jelly, fruit preserves, orange vanilla spread
