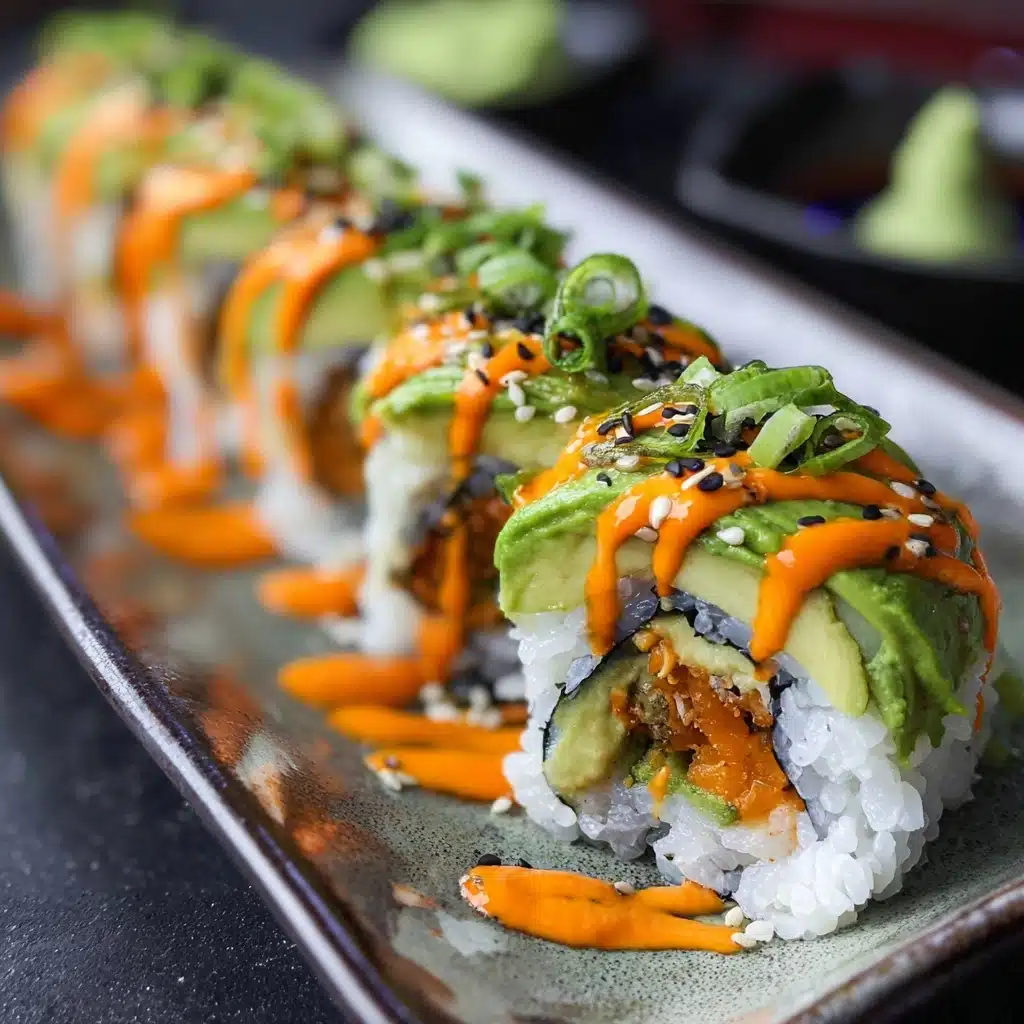
Homemade Dragon Rolls Recipe
If you’re craving a sushi experience that bursts with flavor, texture, and a bit of fun flair, then homemade dragon rolls are exactly what you need. These vibrant rolls combine the creamy richness of avocado, the fresh crunch of cucumber, and the delicious sweetness of cooked shrimp or crab meat, all wrapped in perfectly seasoned sushi rice and nori. Once you master how to craft these beauties yourself, you’ll never want to order out again because nothing compares to the satisfaction and taste of making Homemade Dragon Rolls right in your own kitchen.

Ingredients You’ll Need
The ingredients for Homemade Dragon Rolls are wonderfully simple but crucial—they each bring their own special magic to create a harmony of flavors and textures. From the sticky, slightly tangy sushi rice that holds everything together, to the fresh veggies and succulent seafood that provide a balance of crunch and creaminess, each addition makes this roll unforgettable.
- 2 cups sushi rice: The foundation of any great roll, sushi rice should be sticky yet fluffy to hold your roll tightly.
- 4 sheets nori: Thin seaweed sheets lend their savory flavor and structural support to keep your rolls intact.
- 1 cucumber, sliced into thin strips: Adds a refreshing crispness that lightens the roll’s texture.
- 1 avocado, sliced: Provides rich creaminess that pairs perfectly with seafood.
- 1 cup cooked shrimp or crab meat: The savory protein star, lightly sweet and tender, giving each bite a satisfying depth.
- 2 tbsp sriracha sauce: A touch of heat and zest to awaken the palate and contrast with creamy avocado.
- 1 tbsp toasted sesame seeds: Adds a subtle nuttiness and delicate crunch to finish the dish.
How to Make Homemade Dragon Rolls
Step 1: Prepare the Sushi Rice
Start by rinsing your sushi rice under cold water until the water runs clear—this removes excess starch so the rice cooks to perfection. Cook the rice according to the package instructions, then while still warm, gently fold in a mixture of rice vinegar, sugar, and salt. This seasoning is what gives sushi rice its classic tangy, slightly sweet flavor that complements the fillings beautifully.
Step 2: Slice the Fillings
While the rice cools, get your fillings ready. Thinly slice the cucumber into matchstick strips for crunch, and peel and slice the avocado to creamy, smooth pieces. Make sure your cooked shrimp or crab meat is shredded or chopped into bite-sized bits. Having everything prepped means rolling goes smoothly and your rolls hold together perfectly.
Step 3: Set Up Your Rolling Station
Lay a bamboo sushi mat down on your workspace, then cover it with plastic wrap to keep your mat clean and prevent rice from sticking. Place one sheet of nori shiny side down on the mat—this gives your roll a glossy and attractive outer surface once complete.
Step 4: Spread the Rice on Nori
Wet your hands to prevent the sticky rice from clinging as you spread about one cup of sushi rice evenly over two-thirds of the nori sheet. Leave a small margin along the far edge without rice to seal the roll properly. This step is vital to ensure your Homemade Dragon Rolls hold together and slice neatly.
Step 5: Add Fillings and Sriracha
Add the cooked shrimp or crab meat, cucumber strips, and avocado slices in a neat line across the center of the rice-covered nori. Drizzle your sriracha sauce over the top to add that delightful spicy kick that contrasts with the freshness and creaminess.
Step 6: Roll and Slice
Using the bamboo mat, roll up the nori tightly but gently, applying even pressure to create a firm, cylindrical shape. Once rolled, use a sharp knife dipped in water to slice the roll into eight equal pieces. The water keeps the knife clean and prevents sticking for clean, precise cuts every time.
How to Serve Homemade Dragon Rolls
Garnishes
A sprinkle of toasted sesame seeds over the top not only adds a subtle crunch but enhances the presentation with a touch of rustic elegance. You can also serve these rolls with pickled ginger and a dollop of wasabi for that traditional sushi experience that awakens the taste buds with contrasting flavors.
Side Dishes
Pair your Homemade Dragon Rolls with a light miso soup to warm the palate or a crisp seaweed salad for a refreshing complement. A simple edamame side sprinkled with sea salt also balances the dish and keeps the focus on the fresh flavors of the rolls.
Creative Ways to Present
For a fun twist, arrange your sliced dragon rolls to resemble the curves and scales of a dragon on a long platter, using thin avocado slices as the dragon’s “skin.” You can also drizzle additional sriracha or eel sauce artistically over the plate for an Instagram-worthy presentation that tastes as spectacular as it looks.
Make Ahead and Storage
Storing Leftovers
If you have any leftover rolls, store them in an airtight container in the refrigerator. It’s best to enjoy them within 24 hours while the rice and fillings retain their freshness and texture, as sushi rice tends to harden and vegetables lose their crispness over time.
Freezing
Freezing Homemade Dragon Rolls is not recommended. The delicate textures of the avocado, cucumber, and seafood won’t withstand freezing and thawing, often resulting in soggy rolls with compromised flavor and quality.
Reheating
Since these rolls are best served fresh, reheating is generally avoided; however, if you prefer warm rice, gently steam the rice portion without overcooking the nori or fillings. Otherwise, serve chilled for the best taste and textural balance.
FAQs
Can I use other types of seafood in Homemade Dragon Rolls?
Absolutely! While shrimp and crab are classic choices, you can experiment with cooked lobster, tempura shrimp, or even smoked salmon for a unique twist that suits your taste.
How do I prevent the sushi rice from sticking to my hands?
Keep a small bowl of water nearby to wet your hands before handling the rice. This simple step stops the rice from sticking and allows you to spread it evenly and cleanly.
Is it necessary to use a bamboo mat?
Using a bamboo sushi mat makes rolling much easier and helps you achieve a tight, uniform roll. However, you can also roll by hand using parchment paper or plastic wrap in a pinch.
Can I make the sushi rice ahead of time?
Yes, you can prepare sushi rice a few hours ahead and keep it covered at room temperature. Avoid refrigerating it as cold rice changes the texture, becoming hard or dry.
What should I do if my roll falls apart?
Make sure you’re using enough rice to stick and press rolls tightly while rolling. Also, slightly moistening the edge of the nori before sealing can help it stick better. Practice improves the technique quickly!
Final Thoughts
There’s something truly special about creating Homemade Dragon Rolls from scratch—the freshness of the ingredients, the hands-on process, and the pure deliciousness that follows with every bite. Once you’ve tried making these rolls at home, you’ll appreciate just how rewarding and fun sushi preparation can be. So gather your ingredients, roll up your sleeves, and dive into the wonderful world of sushi making—it’s a culinary adventure you won’t regret!
PrintHomemade Dragon Rolls Recipe

Homemade Dragon Rolls are a vibrant and delicious sushi roll featuring seasoned sushi rice, fresh cucumber, creamy avocado, and savory shrimp or crab meat, all wrapped in crispy nori and drizzled with spicy sriracha for a perfect blend of flavors and textures.
- Prep Time: 20 minutes
- Cook Time: 20 minutes
- Total Time: 40 minutes
- Yield: 4 rolls (about 32 pieces) 1x
- Category: Main Course
- Method: Rolling
- Cuisine: Japanese
- Diet: Halal
Ingredients
Sushi Rice
- 2 cups sushi rice
- 2 tbsp rice vinegar
- 1 tbsp sugar
- 1 tsp salt
Fillings
- 4 sheets nori
- 1 cucumber, sliced into thin strips
- 1 avocado, sliced
- 1 cup cooked shrimp or crab meat
Extras
- 2 tbsp sriracha sauce
- 1 tbsp toasted sesame seeds
Instructions
- Rinse and Cook Rice: Rinse sushi rice under cold water until the water runs clear to remove excess starch. Cook the rice according to package instructions. While still warm, season the rice with a mixture of rice vinegar, sugar, and salt to give it that classic sushi flavor.
- Prepare Fillings: Slice the cucumber and avocado into thin, uniform strips and set them aside. Chop or shred the cooked shrimp or crab meat as needed.
- Set Up Rolling Station: Place a bamboo sushi rolling mat on your workspace and cover it with plastic wrap to prevent sticking. Place a sheet of nori shiny side down on the mat.
- Spread Rice: Wet your hands to avoid rice sticking and evenly spread about 1 cup of the seasoned sushi rice over two-thirds of the nori sheet, leaving some space at the edges.
- Add Fillings: Arrange the shrimp or crab meat, cucumber strips, and avocado slices along the center of the rice-covered nori. Drizzle with sriracha sauce for a spicy kick.
- Roll Sushi: Using the bamboo mat, carefully roll the sushi tightly from the filled end, applying gentle, even pressure to form a firm cylindrical shape.
- Slice Rolls: With a sharp knife dipped in water to prevent sticking, slice the roll into eight equal pieces for serving. Sprinkle toasted sesame seeds on top for added flavor and crunch.
Notes
- Use sushi-grade rice for best texture and flavor.
- Keep your hands and knife wet when handling rice to prevent sticking.
- Adjust the amount of sriracha according to your preferred spice level.
- Substitute shrimp or crab with cooked eel or smoked salmon if desired.
- Serve with soy sauce, pickled ginger, and wasabi for a traditional sushi experience.
Nutrition
- Serving Size: 1 roll (8 pieces)
- Calories: 280
- Sugar: 3g
- Sodium: 450mg
- Fat: 6g
- Saturated Fat: 1g
- Unsaturated Fat: 4g
- Trans Fat: 0g
- Carbohydrates: 40g
- Fiber: 4g
- Protein: 12g
- Cholesterol: 60mg
Keywords: Homemade Dragon Rolls, Sushi, Japanese Roll, Sushi Roll Recipe, Seafood Sushi, Spicy Sushi Roll


