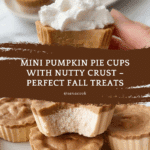
Mini Pumpkin Pie Cups Recipe
If you’re craving a delightful fall treat that’s both charming and bursting with autumnal flavor, you’re going to adore these Mini Pumpkin Pie Cups. These bite-sized wonders combine a tender, subtly nutty crust with a rich, creamy pumpkin filling that’s lightly spiced and sweetened just right. Perfect for parties, cozy evenings, or anytime you want a taste of the season without the fuss, these Mini Pumpkin Pie Cups bring all the warmth of traditional pumpkin pie in a fun, portable pastry that’s as easy to make as it is to devour.
Ingredients You’ll Need
This recipe calls for simple, wholesome ingredients that come together beautifully to create the perfect balance of flavors and textures. Each component plays a role in making your Mini Pumpkin Pie Cups irresistibly delicious—from the nutty crust to the luscious pumpkin topping.
- Almond flour: Adds a naturally sweet, nutty flavor and creates a tender crust texture.
- Coconut flour: Works alongside almond flour to give the crust structure and a subtle coconut hint.
- Coconut oil (melted): Provides moisture and richness, helping bind the crust ingredients perfectly.
- Maple syrup: Offers natural sweetness with a touch of warm, caramel-like depth.
- Cashew butter (or nut/seed butter of choice): Creates a creamy, smooth pumpkin filling with a mild nutty undertone.
- Pumpkin puree: The star ingredient, packed with vibrant color and that unmistakable pumpkin flavor.
- Vanilla extract: Enhances the sweetness and rounds out the spices beautifully.
- Pumpkin pie spice: The classic blend that brings cozy warmth and a little kick of flavor.
- Sea salt: Balances sweetness and enhances overall flavor complexity.
How to Make Mini Pumpkin Pie Cups
Step 1: Prepare the Crust
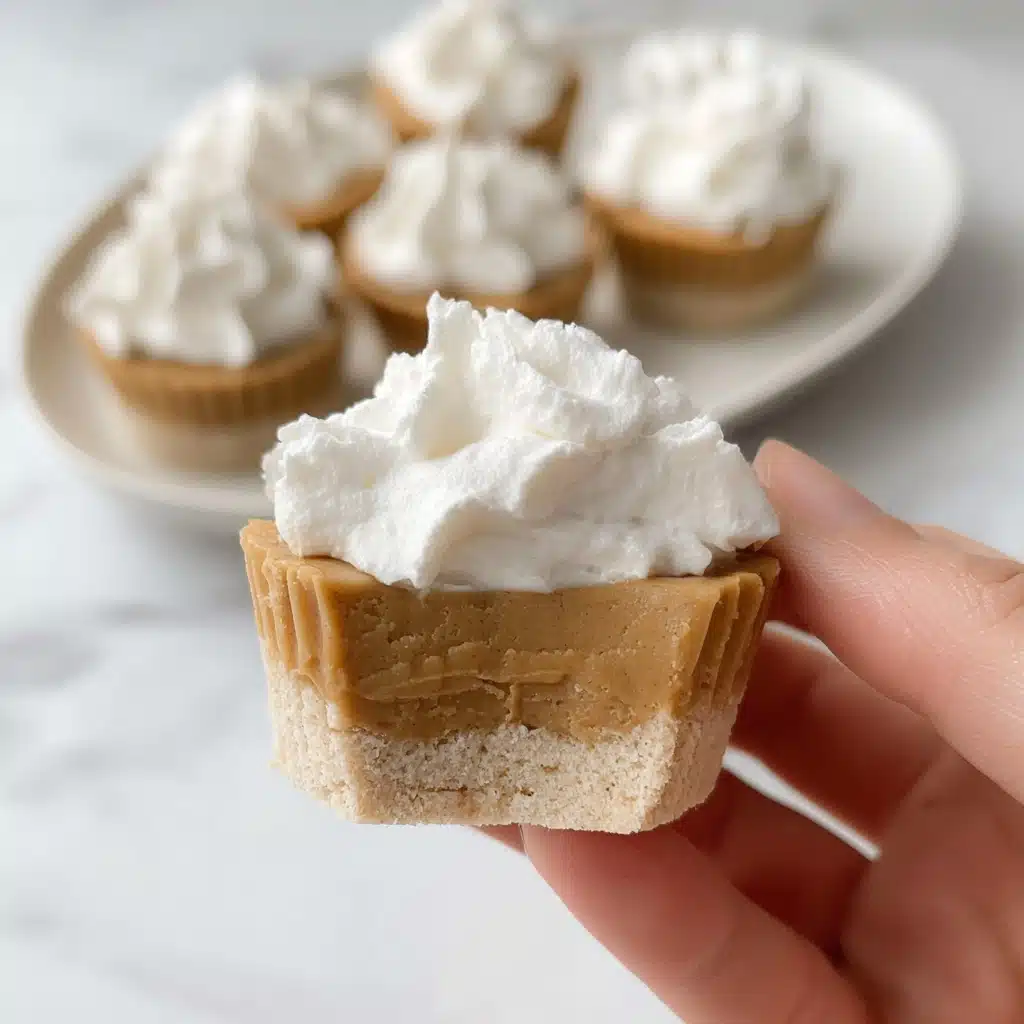
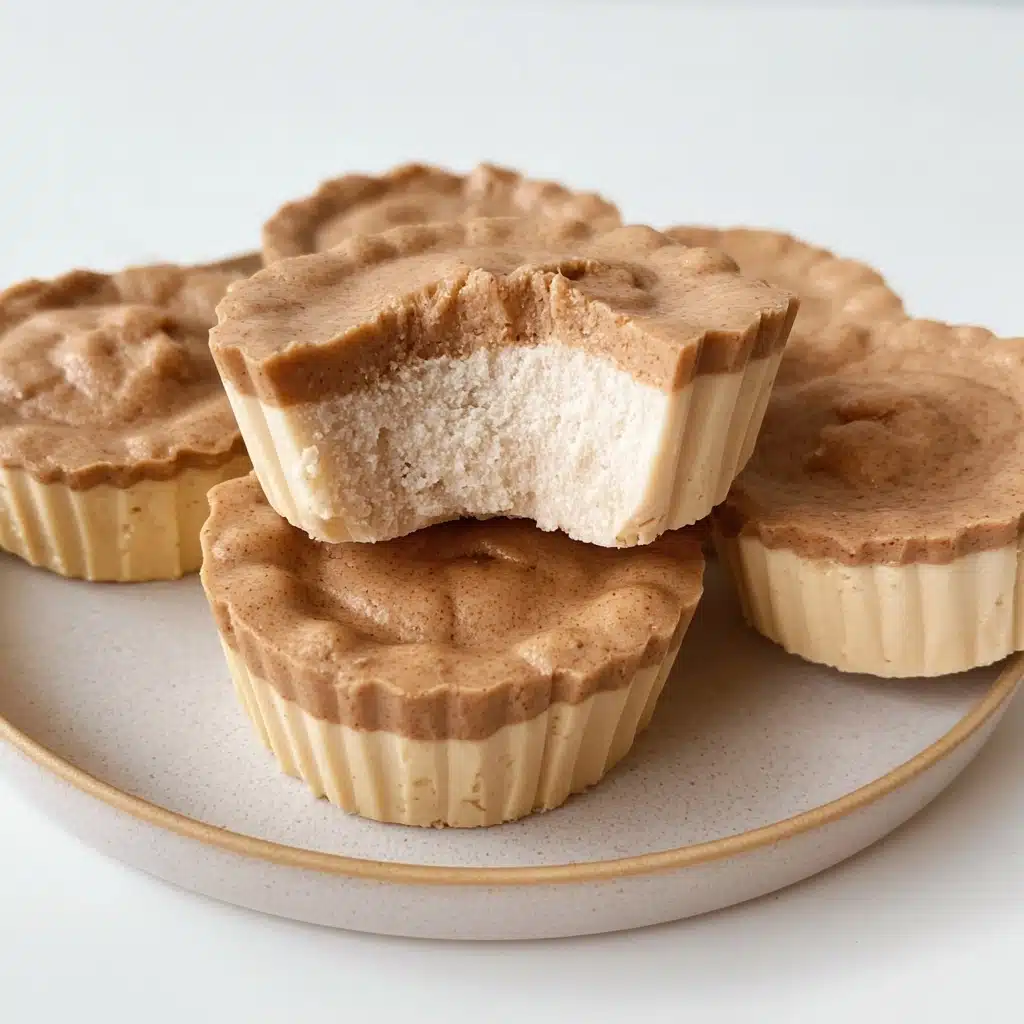
Start by preheating your oven to 350°F and lining a cupcake tin with paper liners. Combine almond flour, coconut flour, melted coconut oil, and maple syrup in a small bowl until the dough comes together smoothly. Scoop about a tablespoon of this mixture per cupcake liner, roll it into a ball, and gently press it flat into the base and slightly up the sides. This will create the perfect little crust cup that crisps up beautifully as it bakes.
Step 2: Bake and Cool the Crusts
Place your crust-filled cupcake tin in the oven and bake for about 12 minutes or until the edges begin to take on a slight golden-brown hue. This step not only cooks the crust but also develops a lovely toasted flavor that complements the pumpkin filling. Once baked, let the crusts cool fully before adding the filling so they stay crisp and firm.
Step 3: Create the Pumpkin Filling
While your crusts are cooling, prepare the luscious pumpkin layer by combining cashew butter, coconut oil, pumpkin puree, maple syrup, vanilla extract, pumpkin pie spice, and sea salt in a mixing bowl. Warm the mixture briefly in the microwave for 15 to 30 seconds or on the stovetop until all the ingredients meld together smoothly. Stir well to ensure a creamy and uniform filling without any lumps.
Step 4: Assemble and Chill
Pour or spoon the pumpkin filling evenly over each cooled crust, filling the mini cups to the top. To set everything nicely and get that firm, pie-like texture, place the cupcake tin in the freezer for at least two hours. This chilling step makes the filling hold its shape perfectly while intensifying the flavors.
How to Serve Mini Pumpkin Pie Cups
Garnishes
To elevate your Mini Pumpkin Pie Cups, consider topping each one with a dollop of fresh whipped cream or a sprinkle of extra pumpkin pie spice. A few toasted pecans or a drizzle of pure maple syrup add beautiful texture contrasts and that extra little touch to impress everyone.
Side Dishes
These sweet little cups are fabulous on their own but pair wonderfully with warm spiced drinks like chai tea or cinnamon-infused coffee. For a festive touch, serve alongside a bowl of cinnamon-spiced apple slices or a simple green salad dressed lightly with apple cider vinaigrette to balance the richness.
Creative Ways to Present
Mini Pumpkin Pie Cups look stunning when arranged on a rustic wooden tray lined with autumn leaves or in small glass jars with decorative ribbons. For a party, place them on tiered stands with seasonal décor like small gourds and cinnamon sticks. You can also serve them in decorative cupcake wrappers for extra charm.
Make Ahead and Storage
Storing Leftovers
After enjoying your Mini Pumpkin Pie Cups, you can store any leftovers in an airtight container in the refrigerator for up to 4 days. Keeping them chilled will maintain the filling’s firmness and preserve the fresh flavors perfectly.
Freezing
If you want to keep these treats longer, they freeze beautifully. Place them in a single layer on a baking sheet and freeze until solid, then transfer to a sealed freezer bag or container. They’ll keep for up to 2 months. Just thaw in the fridge when you’re ready to enjoy them again.
Reheating
For best enjoyment after freezing, thaw your Mini Pumpkin Pie Cups overnight in the fridge and serve chilled or at room temperature. If you prefer your crust slightly more tender, a quick 5-minute warm-up in a low oven can refresh the texture without melting the filling.
FAQs
Can I use a different nut butter for the filling?
Absolutely! Cashew butter creates a creamy texture and mild taste, but almond, sunflower seed butter, or even peanut butter can be great alternatives depending on your flavor preference. Just choose a smooth, natural variety for best results.
Are these Mini Pumpkin Pie Cups gluten-free?
Yes, they are naturally gluten-free since the crust is based on almond and coconut flours instead of traditional wheat flour. This makes them a great option for anyone with gluten sensitivities.
Can I make the crust without coconut oil?
You can substitute coconut oil with melted butter or a neutral oil like avocado oil, but coconut oil adds a slight richness and subtle coconut flavor that complements the pumpkin perfectly.
How long do the Mini Pumpkin Pie Cups need to chill?
Chilling them for at least two hours in the freezer is key to getting that firm, sliceable texture. If you’re short on time, an hour might suffice, but the texture will be creamier and less set.
Can I prepare these ahead for a party?
Definitely! You can make the crusts and pumpkin filling separately, assemble the pies, and freeze them. Then just thaw before serving, making your hosting duties much easier on busy days.
Final Thoughts
Mini Pumpkin Pie Cups are truly a joy to make and serve, capturing all the cozy flavors of pumpkin pie in a fun, bite-sized form. Whether you’re making them for a holiday gathering, a sweet snack, or a festive dessert, these cups bring smiles and warm memories. I hope you give them a try and find yourself reaching for seconds just like I do every time!
PrintMini Pumpkin Pie Cups Recipe
These Mini Pumpkin Pie Cups are a delightful, bite-sized twist on traditional pumpkin pie. With a nutty, naturally sweetened crust and a creamy pumpkin layer infused with warming spices, they make the perfect seasonal dessert that’s both gluten-free and refined sugar-free. Ideal for fall gatherings or anytime you want a small indulgence, these cups can be topped with whipped cream for extra richness.
- Prep Time: 15 minutes
- Cook Time: 12 minutes
- Total Time: 2 hours 27 minutes
- Yield: 12 mini pumpkin pie cups 1x
- Category: Dessert
- Method: Baking, chilling
- Cuisine: American
- Diet: Gluten Free
Ingredients
For the crust
- 1/2 cup almond flour
- 1/4 cup coconut flour
- 3 tbsp coconut oil, melted
- 2 tbsp maple syrup
For the pumpkin layer
- 1/2 cup cashew butter (or nut/seed butter of choice)
- 1/2 cup coconut oil
- 1/3 cup pumpkin puree
- 1/4 cup maple syrup
- 1 tsp vanilla extract
- 2 tsp pumpkin pie spice
- 1/4 tsp sea salt
Instructions
- Preheat and prepare cupcake liners: Preheat your oven to 350°F (175°C). Place cupcake liners into your cupcake tin to get ready for the crust.
- Make the crust: In a small bowl, combine almond flour, coconut flour, melted coconut oil, and maple syrup. Mix well until the dough comes together. Scoop about 1 tablespoon of dough for each liner, roll into balls, then press each ball into the liner to form an even crust base.
- Bake the crust: Bake the crusts for 12 minutes or until the edges start to turn golden brown. Remove from the oven and allow them to cool completely before adding the filling.
- Prepare the pumpkin layer: In a separate bowl, add the cashew butter, coconut oil, pumpkin puree, maple syrup, vanilla extract, pumpkin pie spice, and sea salt. Microwave for 15–30 seconds or warm gently on the stovetop, then stir vigorously until the mixture is fully combined and smooth.
- Assemble the pumpkin cups: Pour the pumpkin mixture evenly over each cooled crust in the cupcake liners, filling them up fully.
- Freeze to set: Place the filled cupcake tin in the freezer for at least two hours to allow the pumpkin layer to firm up.
- Serve and garnish: Once set, optionally top each mini pie cup with whipped cream before serving. Enjoy these chilled treats as a perfect fall dessert or snack!
Notes
- You can substitute cashew butter with other nut or seed butters such as almond or sunflower seed butter to suit your preference.
- For a vegan whipped cream topping, use coconut-based whipped cream.
- Allow the pumpkin cups to soften at room temperature for a few minutes before eating if they are too firm from freezing.
- Store leftover pumpkin pie cups in the freezer in an airtight container for up to a week.
- If you prefer a less sweet dessert, reduce maple syrup slightly in either the crust or pumpkin layer.
Nutrition
- Serving Size: 1 mini pumpkin pie cup
- Calories: 180
- Sugar: 8g
- Sodium: 35mg
- Fat: 15g
- Saturated Fat: 7g
- Unsaturated Fat: 7g
- Trans Fat: 0g
- Carbohydrates: 10g
- Fiber: 3g
- Protein: 3g
- Cholesterol: 0mg
Keywords: mini pumpkin pie, pumpkin pie cups, gluten free dessert, fall dessert, no refined sugar, healthy pumpkin dessert, bite-sized pumpkin pie


