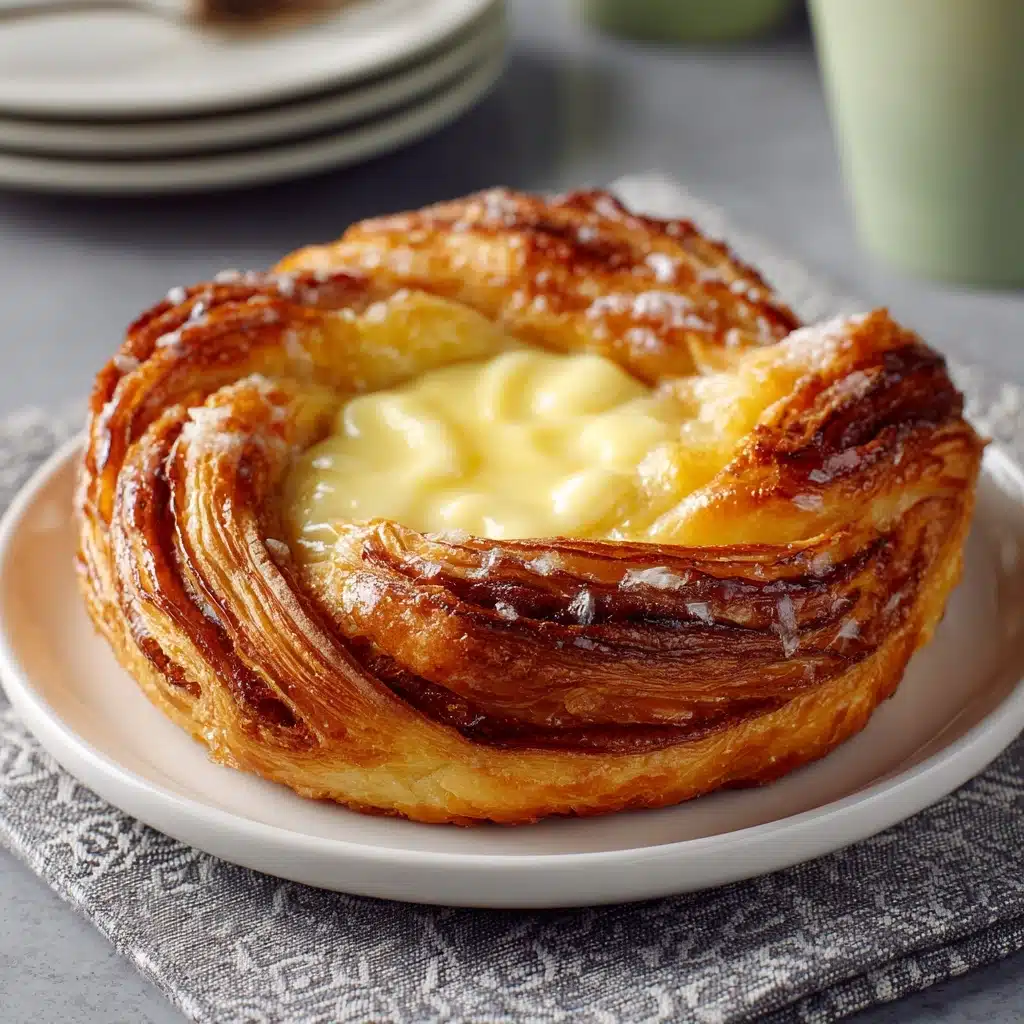
Easy Homemade Cheese Danish Recipe
Discover an Irresistible Treat with this Cheese Danish Delight recipe, where flaky golden pastry wraps around a silken, sweet cream cheese center. Every bite delivers that perfect marriage of buttery crunch and creamy, tangy filling—a combination that transforms even an ordinary morning into something magical. Whether you’re serving these for a brunch, as an afternoon pick-me-up, or as a cozy dessert, this easy-to-follow recipe promises a bakery-quality experience from your own oven.

Ingredients You’ll Need
Here’s a snapshot of how simple ingredients, each with their special role, come together to create a truly extraordinary pastry. Each item serves its own vital purpose, ensuring the finished Cheese Danish boasts impeccable flavor and texture.
- All-purpose flour: The base of the dough, creating structure and lightness when handled gently.
- Granulated sugar: Lends subtle sweetness to the dough to complement the filling.
- Salt: Just a teaspoon balances out the sweetness and amplifies all the flavors.
- Unsalted butter (cold and cubed): Essential for that tender, flaky pastry and rich mouthfeel—keep it cold for best results!
- Cream cheese (softened): The star of the filling, bringing tanginess and velvety smoothness.
- Powdered sugar: Blends seamlessly into the cream cheese for a melt-in-your-mouth sweetness.
- Vanilla extract: Adds warmth and depth, transforming the filling from simple to luxurious.
- Large egg (beaten, for egg wash): Brushed on top for a gorgeous golden finish and light sheen.
- Milk (for egg wash): Ensures the egg wash goes on smoothly, aiding in browning and shine.
How to Make Easy Homemade Cheese Danish Recipe
Step 1: Bring the Dough Together
Begin your journey to discover an Irresistible Treat by combining your flour, sugar, and salt in a big mixing bowl. This simple trio forms the background harmony, while the pops of cold, cubed butter mingle in to create a crumbly, pebbly texture. Use your fingertips or a pastry cutter to get that sandy consistency—these little bits of butter are what make your Danish so dang flaky!
Step 2: Form, Chill, and Rest
Next, slowly add cold water—just a little at a time—until the dough comes together. Gently press it into a disk, wrap it up, and let it chill in the fridge for at least an hour. This patience pays off: resting and cooling keeps the butter solid and helps relax the gluten, making your final pastry melt-in-your-mouth good.
Step 3: Roll and Cut the Dough
Preheat your oven to a toasty 400°F (200°C), so it’s ready to work its magic. Roll out your chilled dough into a neat rectangle, and slice into 4×4-inch squares. It’s almost like prepping little edible canvases, each waiting for that creamy filling!
Step 4: Mix Up the Cream Cheese Filling
In a separate bowl, blend together the softened cream cheese, powdered sugar, and vanilla extract. Stir until the mixture is thick, glossy, and so smooth you could eat it with a spoon (and no one’s judging if you sneak a taste).
Step 5: Fill, Fold, and Seal
Spoon a generous dollop of that luscious filling right into the center of each dough square. It’s time to get creative: fold the corners inward and pinch in the middle. This little origami move creates a tidy pocket that keeps all that creamy goodness safe inside.
Step 6: Add the Finishing Golden Touch
Whisk your egg and milk together to craft a silky egg wash. Gently brush this across the tops of your pastries. Not only does this step help them bake up beautifully golden, but it also gives each Danish that irresistible sheen and crisp edge.
Step 7: Bake to Perfection
Slide your pan into the preheated oven, and let the aroma fill your kitchen! After 15-20 minutes, your Cheese Danishes should be puffed and shaded with glistening gold. Cool slightly before serving so you don’t burn your tongue on molten cheese.
How to Serve Easy Homemade Cheese Danish Recipe
Garnishes
For a truly festive finish, dust your fresh Cheese Danish Delights with a little extra powdered sugar, or add a drizzle of simple icing. You might even sprinkle a few fresh berries or zest some lemon on top, letting you both see and taste that you’re about to discover an Irresistible Treat in every bite.
Side Dishes
Pairing these Danishes is almost as fun as baking them. Think bold and beautiful—a mug of robust coffee, a fruity herbal tea, or a frothy latte brings out their creamy flavor. They’re dreamy alongside fresh fruit, a crisp green salad, or even a slice of savory ham for a special brunch spread.
Creative Ways to Present
Aim for a bakery window look! Stack your pastries on a tiered cake stand or arrange in a rustic basket lined with linen for a casual, inviting feel. For an extra wow factor, serve each Danish in a colorful cupcake liner and scatter edible flowers around the platter, inviting everyone to discover an Irresistible Treat with both eyes and taste buds.
Make Ahead and Storage
Storing Leftovers
Once you’ve made your batch, keep any leftover Cheese Danish Delights in an airtight container at room temperature for up to one day, or in the refrigerator for up to three days. This helps retain that flaky crust and luscious, creamy center. Just remember: these are best enjoyed fresh, but leftovers are still pretty irresistible!
Freezing
Want to enjoy a Discover an Irresistible Treat weeks later? You’re in luck! Simply wrap any cooled, baked Danishes tightly in plastic wrap and place them in a freezer-safe bag. They’ll keep their lovely flavor and texture for up to two months—ready to thaw and heat whenever the craving strikes.
Reheating
Give your Danish Delights new life by reheating in a 300°F oven for about 8-10 minutes if refrigerated, or 12-15 minutes if frozen. This helps restore their signature flaky crust. A few minutes is all it takes to rediscover an Irresistible Treat just like it’s fresh out of the oven.
FAQs
Can I use store-bought puff pastry instead of making dough from scratch?
Absolutely! If you’re short on time, high-quality store-bought puff pastry works beautifully. Just roll, cut, and follow the filling and shaping instructions to still discover an Irresistible Treat.
Can I make these Danishes in advance?
Yes—you can make the dough and the filling a day ahead and keep them refrigerated until you’re ready to assemble and bake. Danish assembly and fresh baking guarantee the best possible taste and texture.
What other fillings can I use?
You can switch things up with fruit preserves, lemon curd, or even chocolate hazelnut spread as a fun twist. Get creative and discover an Irresistible Treat each time with a new flavor profile.
How do I keep the Danish from opening during baking?
Make sure you firmly pinch the dough corners together in the center, and press gently for a tight seal. Chilling the assembled pastries for 10 minutes before baking also helps them hold their shape, ensuring you’ll discover an Irresistible Treat that looks as good as it tastes.
Is it possible to make this recipe gluten-free?
You can try swapping all-purpose flour for your favorite 1:1 gluten-free baking blend. Just be sure to check the package instructions for the best results—sometimes, you may need to adjust the hydration. You might even discover an Irresistible Treat tailored perfectly to your dietary needs.
Final Thoughts
Whether you’re a baking enthusiast or a total beginner, you’ll find endless delight in creating and sharing these Cheese Danish Delights. Invite friends or family to pause and savor the moment as you all discover an Irresistible Treat together—warm from the oven, every bite a little celebration.
PrintEasy Homemade Cheese Danish Recipe

Indulge in the delightful flavors of these Cheese Danish pastries that are perfect for breakfast or a sweet treat. A flaky pastry filled with a creamy cheese mixture, these danishes are a true delight for any occasion.
- Prep Time: 1 hour 15 minutes
- Cook Time: 15-20 minutes
- Total Time: 1 hour 35 minutes
- Yield: 12 danishes 1x
- Category: Pastry
- Method: Baking
- Cuisine: American
- Diet: Vegetarian
Ingredients
Dough:
- 2 cups all-purpose flour
- 1 tablespoon granulated sugar
- 1 teaspoon salt
- 1 cup unsalted butter, cold and cubed
Filling:
- 1/2 cup cream cheese, softened
- 1/4 cup powdered sugar
- 1 teaspoon vanilla extract
Egg Wash:
- 1 large egg, beaten
- 1 tablespoon milk
Instructions
- Dough Preparation: In a large bowl, whisk together the flour, granulated sugar, and salt. Add the cold, cubed butter and mix until the mixture resembles coarse crumbs. Gradually add 1/4 cup of cold water, shaping the dough into a disk. Refrigerate for at least 1 hour.
- Preheat and Prep: Preheat oven to 400°F (200°C) and line a baking sheet with parchment paper.
- Roll and Cut: Roll out the chilled dough on a floured surface to 1/4 inch thick. Cut into 4×4-inch squares.
- Prepare Filling: Mix cream cheese, powdered sugar, and vanilla until smooth.
- Fill and Shape: Place cream cheese mixture in the center of each square. Fold corners towards the center, pinching to seal.
- Egg Wash and Bake: Whisk egg and milk, brush over danishes. Bake for 15-20 minutes until golden.
- Serve: Allow to cool slightly before serving.
Nutrition
- Serving Size: 1 danish
- Calories: 280
- Sugar: 8g
- Sodium: 220mg
- Fat: 18g
- Saturated Fat: 11g
- Unsaturated Fat: 6g
- Trans Fat: 0g
- Carbohydrates: 24g
- Fiber: 1g
- Protein: 4g
- Cholesterol: 70mg
Keywords: Cheese Danish, Pastry, Breakfast, Brunch, Cream Cheese, Sweet Treat


